【Day17】Google Sheets - 免費儲存資料的好選擇,一起進入省錢起手式

這篇文章寫於 2020 年,文中的工具與版本可能已經更新,實作時請以官方文件為準。
本文目錄
專案最基本的就是:符合客戶預算與實際使用需求
為什麼選擇 Google Sheets 作為資料載體?
一般來說爬蟲的資料都是儲存到資料庫,但是我相信絕大多數的人不太可能隨時隨地打開資料庫觀看,而且存在資料庫除非你請網頁工程師幫你完成前端視覺化,不然直接看資料庫絕對會讓你懷疑人生XD
經過多方思慮我最後採用 Google Sheets 的服務,主要理由:
- 只要有網路我就能看
- 絕大多數人都有使用 Google Sheets 的經驗
- 使用者能輕易的將 Google Sheets 轉化成圖表
- 你不需要一台 Server 專門來存這些資料
免費
儘管 Google Sheets 並不完美,但他真的很適合用在這個專案上面
今日目標
- 取得 Google Sheets 憑證(credentials)
- 在專案加入官方提供的範例程式做測試
- 將 Google Sheets 的憑證、授權檔加入 .gitignore
1. 取得 Google Sheets 憑證(credentials)
如果把 Google Sheets 想像成一個藏寶庫,憑證(credentials)就像是一把鑰匙,只有擁有這把鑰匙的人才有打開門的資格;不然這個藏寶庫誰都能任意進出豈不是很危險?
憑證(credentials)取得的步驟
- 請先確認
已經安裝過 Node.js & npm(跟著教學走的人都安裝過),有 Goolge 帳號 - 進入 Google Sheet Node.js 申請憑證(credentials)的網頁
-
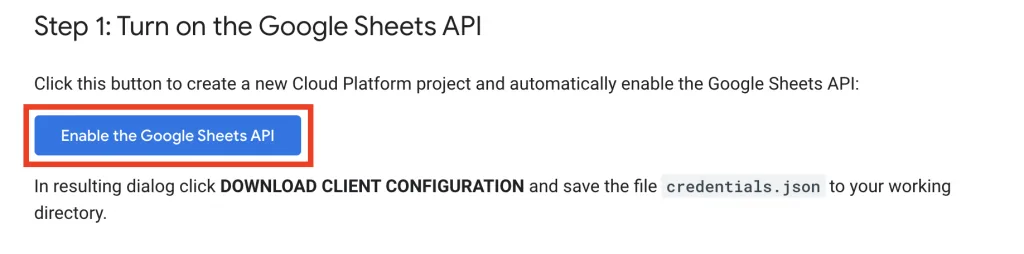
按下紅框處按鈕 Enable theGoogle Sheets API
-
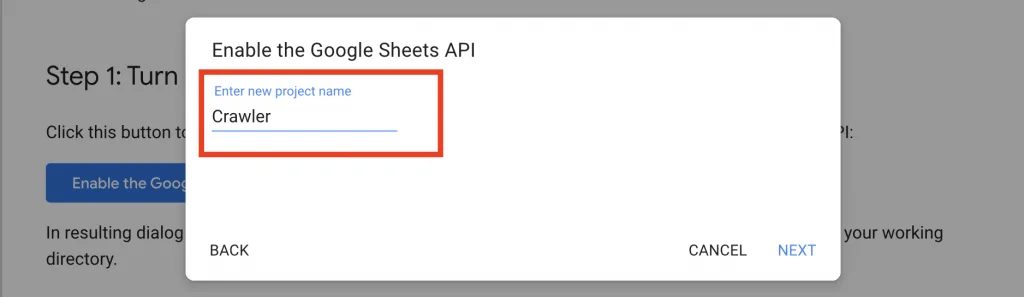
輸入專案的名稱,建議填寫符合專案功能的命名
-
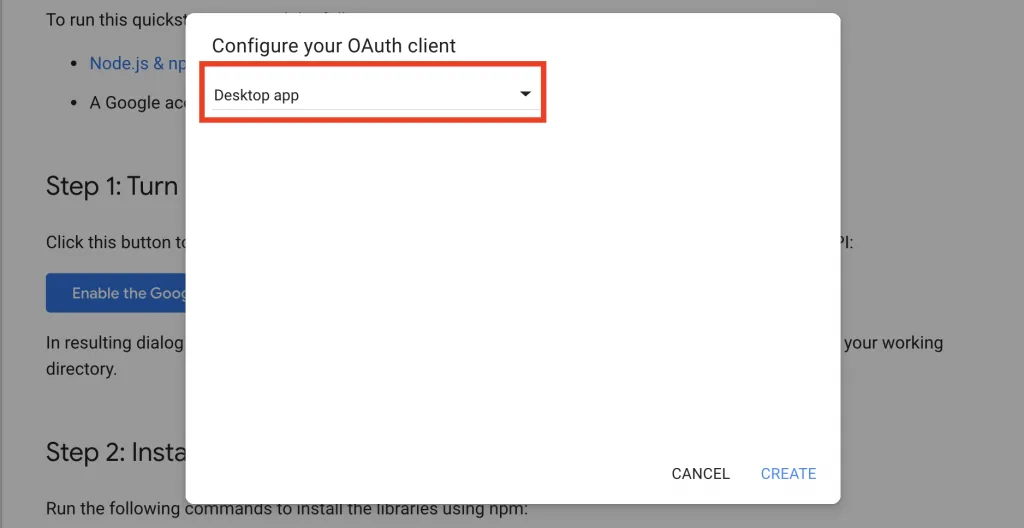
本轉案選擇 Desktop app 即可
-
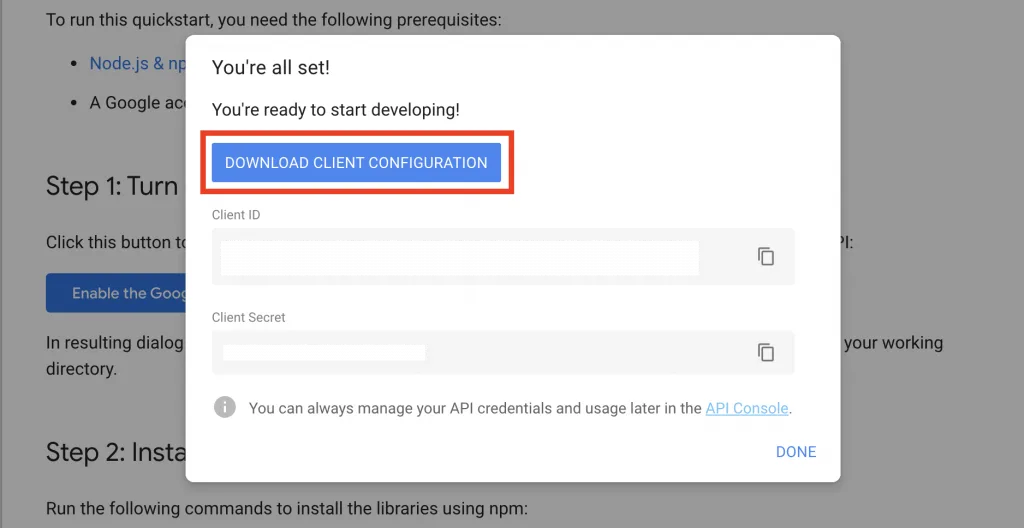
千萬不要忘記下載這個憑證,下面的Client ID、Client Secret不需特別複製,都存在憑證檔裡面了
-
- 在專案的
tools 資料夾下新增一個 google_sheets 資料夾,專門存放 Google Sheets 相關檔案 - 將
下載好的憑證(credentials.json)放進去 google_sheets 資料夾,這樣的目錄節結構會方便我們日後管理
2. 在專案加入官方提供的範例程式做測試
在詳細的閱讀官方文件之前,我會先用官方的範例程式確認他能否在我的專案順利運作,如果遇到太多環境衝突才能儘早尋求替代方案
-
下載
googleapis套件yarn add googleapis@39 -
在
tools/google_sheets 資料夾中新增 index.js檔案,並複製 Google 範例程式碼貼上const fs = require('fs'); const readline = require('readline'); const { google } = require('googleapis'); // If modifying these scopes, delete token.json. const SCOPES = ['https://www.googleapis.com/auth/spreadsheets.readonly']; // The file token.json stores the user's access and refresh tokens, and is // created automatically when the authorization flow completes for the first // time. const TOKEN_PATH = 'tools/google_sheets/token.json'; // Load client secrets from a local file. fs.readFile('credentials.json', (err, content) => { if (err) return console.log('Error loading client secret file:', err); // Authorize a client with credentials, then call the Google Sheets API. authorize(JSON.parse(content), listMajors); }); /** * Create an OAuth2 client with the given credentials, and then execute the * given callback function. * @param {Object} credentials The authorization client credentials. * @param {function} callback The callback to call with the authorized client. */ function authorize (credentials, callback) { const { client_secret, client_id, redirect_uris } = credentials.installed; const oAuth2Client = new google.auth.OAuth2( client_id, client_secret, redirect_uris[0]); // Check if we have previously stored a token. fs.readFile(TOKEN_PATH, (err, token) => { if (err) return getNewToken(oAuth2Client, callback); oAuth2Client.setCredentials(JSON.parse(token)); callback(oAuth2Client); }); } /** * Get and store new token after prompting for user authorization, and then * execute the given callback with the authorized OAuth2 client. * @param {google.auth.OAuth2} oAuth2Client The OAuth2 client to get token for. * @param {getEventsCallback} callback The callback for the authorized client. */ function getNewToken (oAuth2Client, callback) { const authUrl = oAuth2Client.generateAuthUrl({ access_type: 'offline', scope: SCOPES, }); console.log('Authorize this app by visiting this url:', authUrl); const rl = readline.createInterface({ input: process.stdin, output: process.stdout, }); rl.question('Enter the code from that page here: ', (code) => { rl.close(); oAuth2Client.getToken(code, (err, token) => { if (err) return console.error('Error while trying to retrieve access token', err); oAuth2Client.setCredentials(token); // Store the token to disk for later program executions fs.writeFile(TOKEN_PATH, JSON.stringify(token), (err) => { if (err) return console.error(err); console.log('Token stored to', TOKEN_PATH); }); callback(oAuth2Client); }); }); } /** * Prints the names and majors of students in a sample spreadsheet: * @see https://docs.google.com/spreadsheets/d/1BxiMVs0XRA5nFMdKvBdBZjgmUUqptlbs74OgvE2upms/edit * @param {google.auth.OAuth2} auth The authenticated Google OAuth client. */ function listMajors (auth) { const sheets = google.sheets({ version: 'v4', auth }); sheets.spreadsheets.values.get({ spreadsheetId: '1BxiMVs0XRA5nFMdKvBdBZjgmUUqptlbs74OgvE2upms', range: 'Class Data!A2:E', }, (err, res) => { if (err) return console.log('The API returned an error: ' + err); const rows = res.data.values; if (rows.length) { console.log('Name, Major:'); // Print columns A and E, which correspond to indices 0 and 4. rows.map((row) => { console.log(`${row[0]}, ${row[4]}`); }); } else { console.log('No data found.'); } }); } -
在終端機(Terminal)執行指令,測試能否運行
node tools/google_sheets/index.js-
你應該會先遇到找不到 credentials.json 的錯誤

請將範例程式中
讀取 'credentials.json' 路徑修改成專案的路徑 'tools/google_sheets/credentials.json'//fs.readFile('credentials.json', (err, content) => { fs.readFile('tools/google_sheets/credentials.json', (err, content) => { if (err) return console.log('Error loading client secret file:', err); // Authorize a client with credentials, then call the Google Sheets API. authorize(JSON.parse(content), listMajors); }); -
再執行一次
node tools/google_sheets/index.js時下面會有連結請你打開
-
打開後的網頁會要你選擇登入的 Google 帳號,看到下面的網頁時別害怕,點擊
進階然後再點擊前往「Quickstart」(不安全)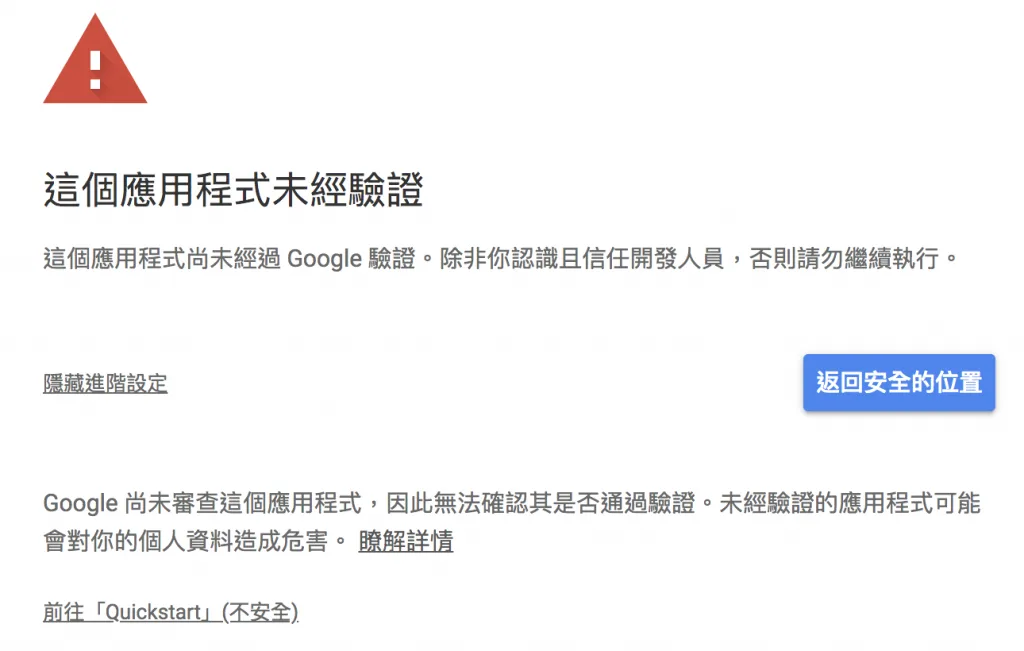
-
接著所有的授權都必須按
允許,最後你會看到一組授權碼,把他複製下來貼回終端機(Terminal)就完成惹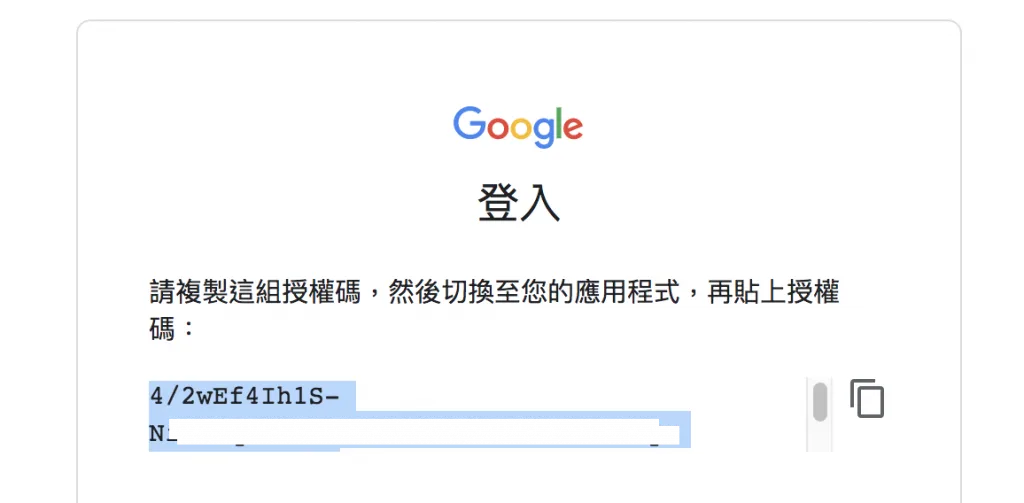
-
如果終端機(Terminal)有輸出類似下面的資料時就代表你成功了
Name, Major: Alexandra, English Andrew, Math Anna, English Becky, Art Benjamin, English Carl, Art Carrie, English Dorothy, Math ... -
聰明的你會發現
專案根目錄下多了一個 token.json的檔案,如果說 credentials.json 是打開藏寶庫的鑰匙,token.json 就像是能夠把裡面寶藏搬進搬出的權杖,而這個權杖是有期限的(expiry_date),期限過了就需要再申請-
為了方便管理我們把
token.json 搬移到 tools/google_sheets的資料夾下 -
修改範例程式中讀取 token.json 的路徑//const TOKEN_PATH = 'token.json'; const TOKEN_PATH = 'tools/google_sheets/token.json';
-
-
3. 將 Google Sheets 的憑證、授權檔加入 .gitignore
我想應該不會有人想把藏寶庫的鑰匙跟權杖公開讓大家使用吧?如果你不小心把 credentials.json、token.json 兩個檔案加入版控就等於把你 Google Sheets 的權限送給別人了,所以你要調整 .gitignore 如下:
node_modules
.env
chromedriver.exe
debug.log
credentials.json
token.json
不熟悉的朋友可以參考 【Day7】gitignore-請勿上傳敏感、主程式以外的資料 的文章
ℹ️ 專案原始碼
- 今天的完整程式碼可以在這裡找到喔
- 我也貼心地把昨天的把昨天的程式碼打包成壓縮檔,你可以用裡面乾淨的環境來實作今天Google Sheets的起手式喔
- 請記得在終端機下指令 yarn 才會把之前的套件安裝
- 要在tools/google_sheets資料夾放上自己的憑證,今天的程式才能執行喔
在許多人的幫助下,本系列文章已出版成書,並添加了新的篇章與細節補充:
- 加入更多實務經驗,用完整的開發流程讓讀者了解專案每個階段要注意的事項
- 將爬蟲的步驟與技巧做更詳細的說明,讓讀者可以輕鬆入門
- 調整專案架構
- 優化爬蟲程式,以更廣的視角來擷取網頁資訊
- 增加資料驗證、錯誤通知等功能,讓爬蟲執行遇到問題時可以第一時間通知使用者
- 排程部分改用 node-schedule & pm2 的組合,讓讀者可以輕鬆管理專案程序並獲得更精確的 log 資訊
有興趣的朋友可以到天瓏書局選購,感謝大家的支持。





留言載入中…