靠問 ChatGPT 寫程式,能完成 OpenAI & Linebot 的 Side Project 嗎?(上)

本文目錄
許多網紅都說 ChatGPT 寫程式的能力超強,不但可以解 LeeCode 還能幫你優化程式,甚至寫點小專案都不是問題,但事實真的是如此嗎?就讓筆者透過一個 Side Project 來測試看看。
大綱

▋ 詢問 ChatGPT 實作的步驟
▋ 前置作業 1:申請 OpenAI API key
▋ 前置作業 2:取得 Line 的 Channel access token 和 Channel secret
▋ 建立 OpenAI-Linebot 的 Node.js 專案
▋ 小結:他還還努力學習中
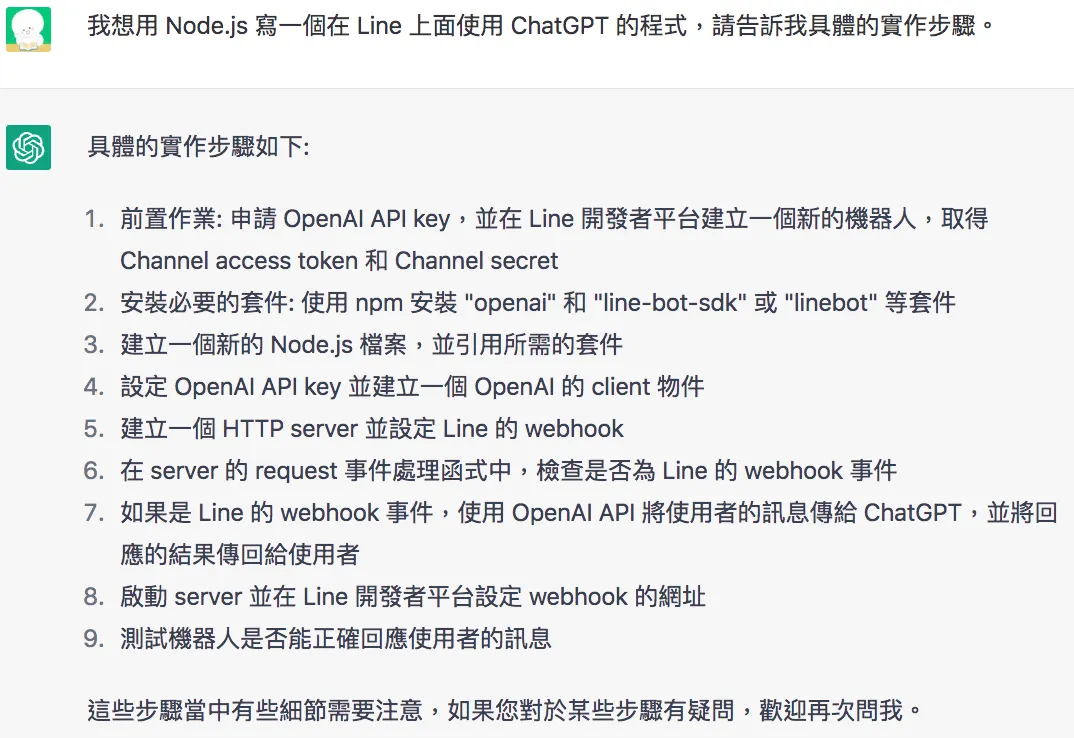
詢問 ChatGPT 實作的步驟
目前看起來,ChatGPT 回應給我的實作步驟可行性很高,而且每個重點都提示到了。
前置作業 1:申請 OpenAI API key
SETP 1:進入 OpenAI 官網:https://beta.openai.com/
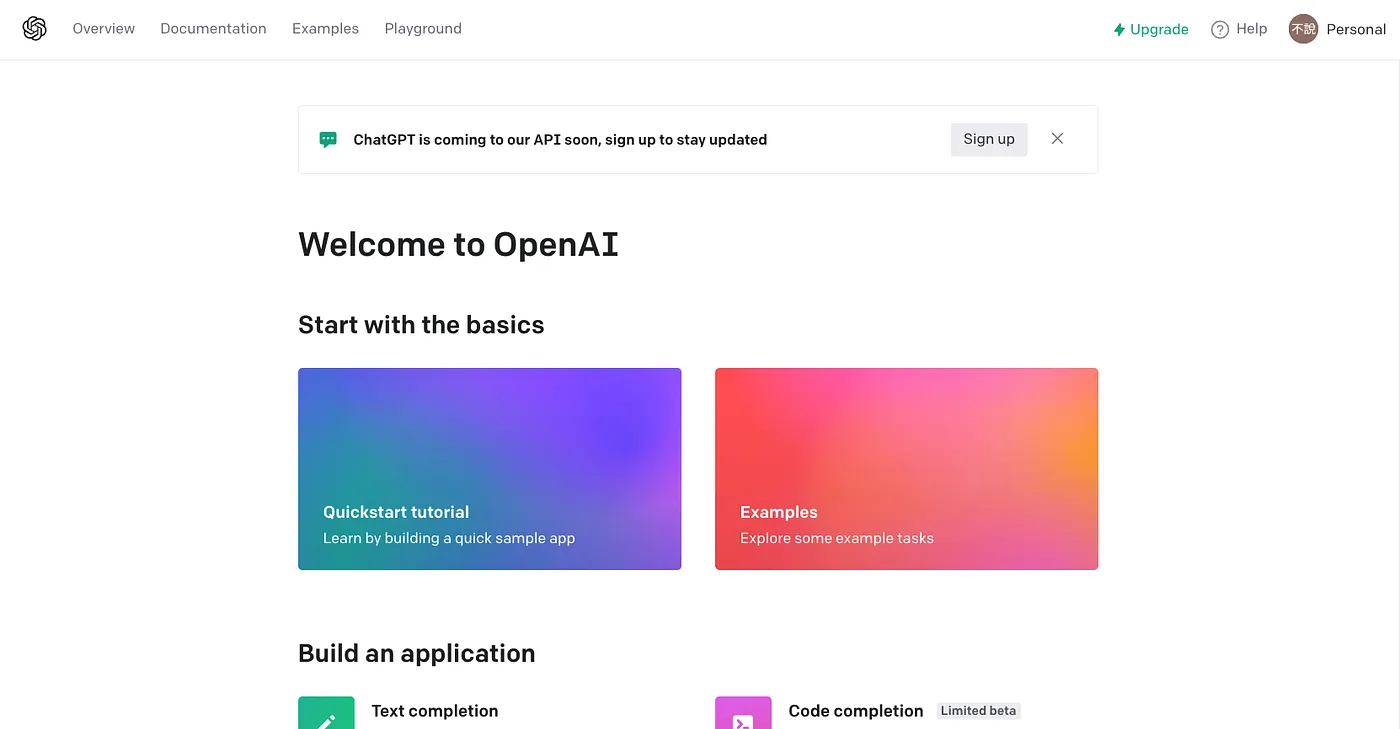
SETP 2:註冊 & 登入 OpenAI 帳號,進入首頁。
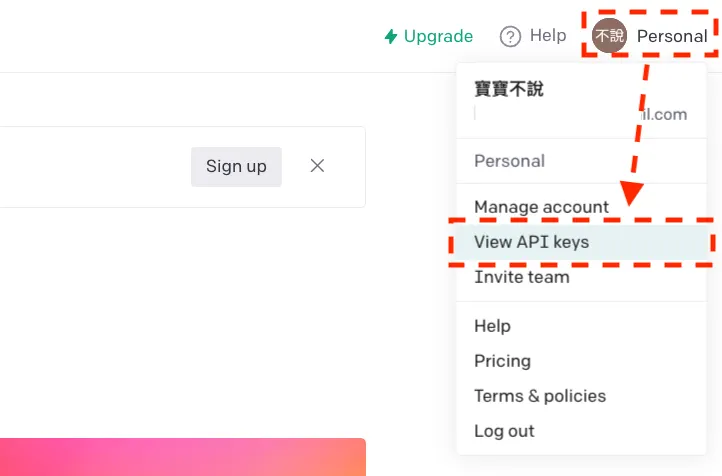
SETP 3:點擊右上角圖像,選擇「View API keys」。
SETP 4:點擊「Create new secret key」。
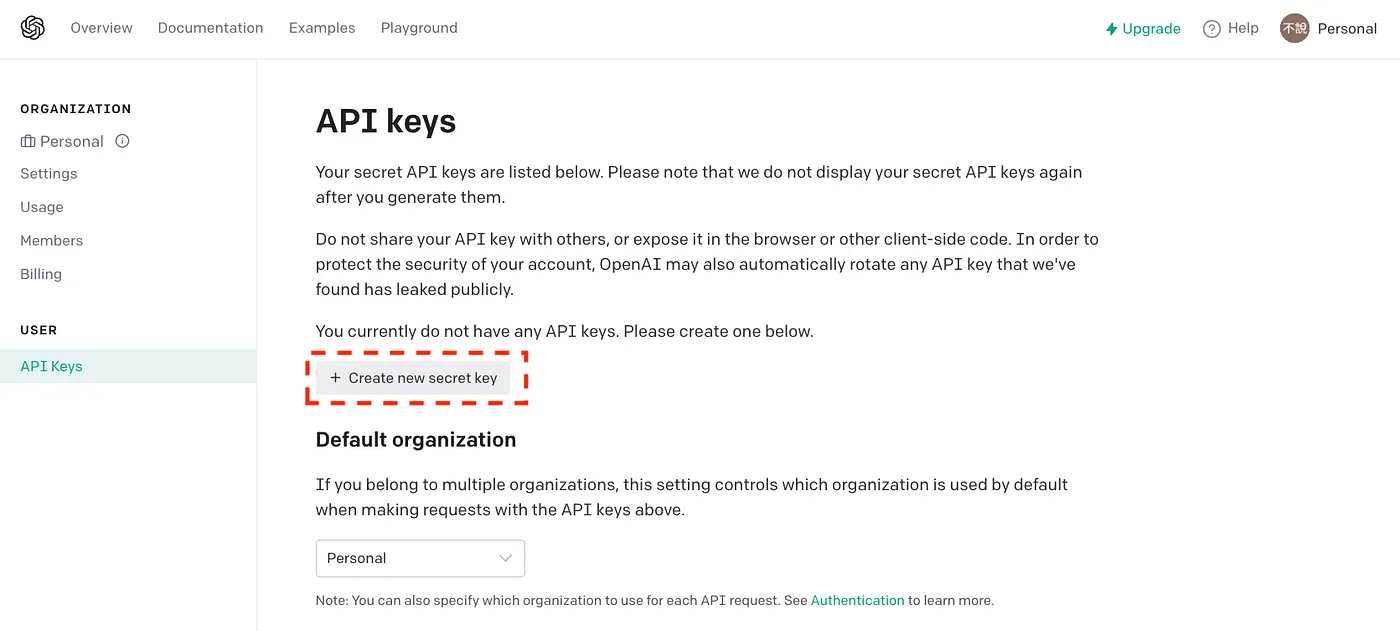
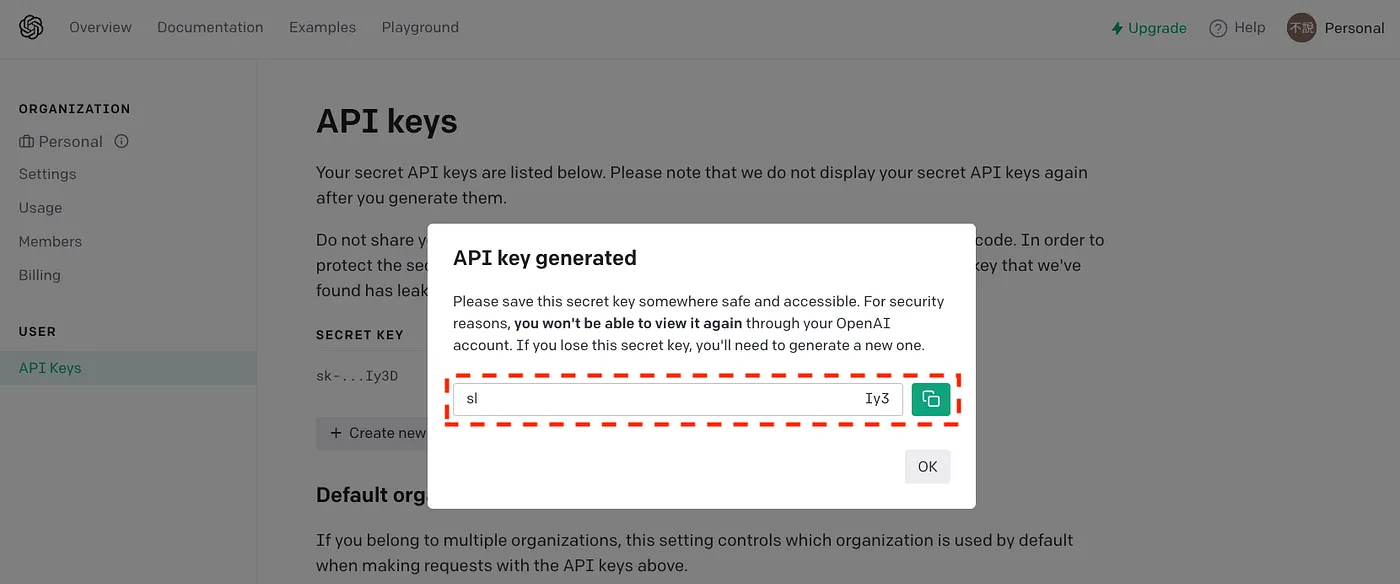
SETP 5:產生出來的 API Key 請保存好,之後你都不會再看到他了。
前置作業 2:取得 Line 的 Channel access token 和 Channel secret
因為步驟比較複雜,所以我有詢問一下 ChatGPT :
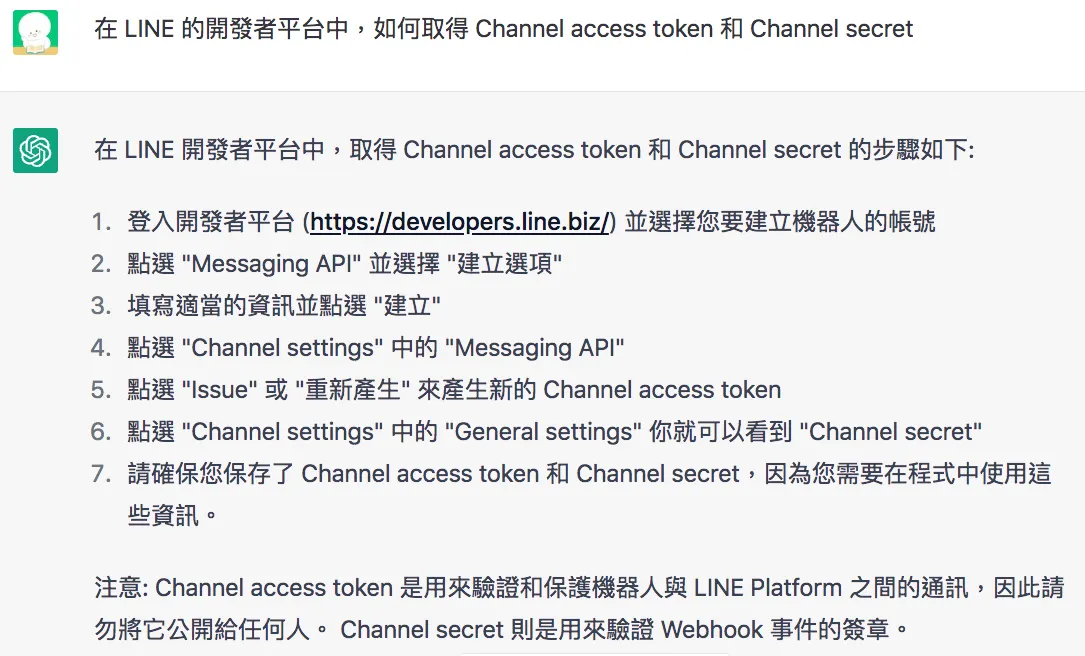
SETP 1:登入開發者平台,網址:https://developers.line.biz/zh-hant/ 。
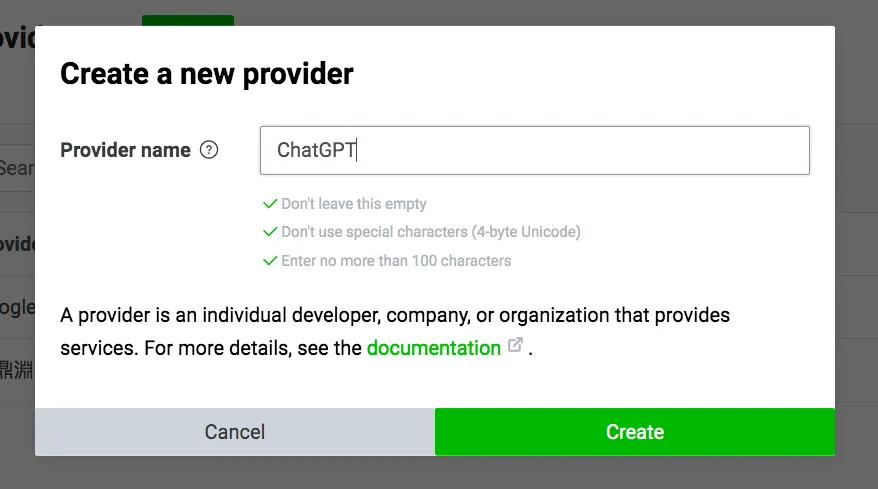
SETP 2:建立一個 provider,名字自取。
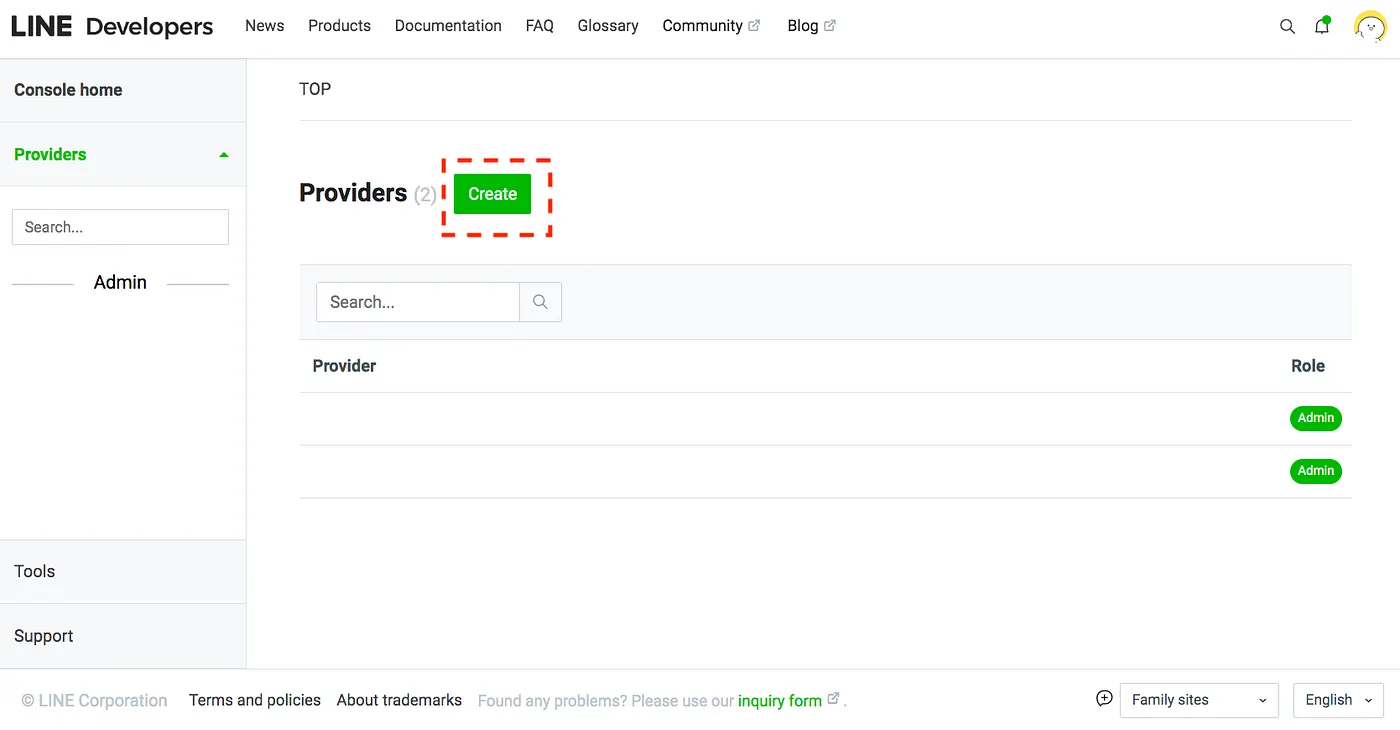
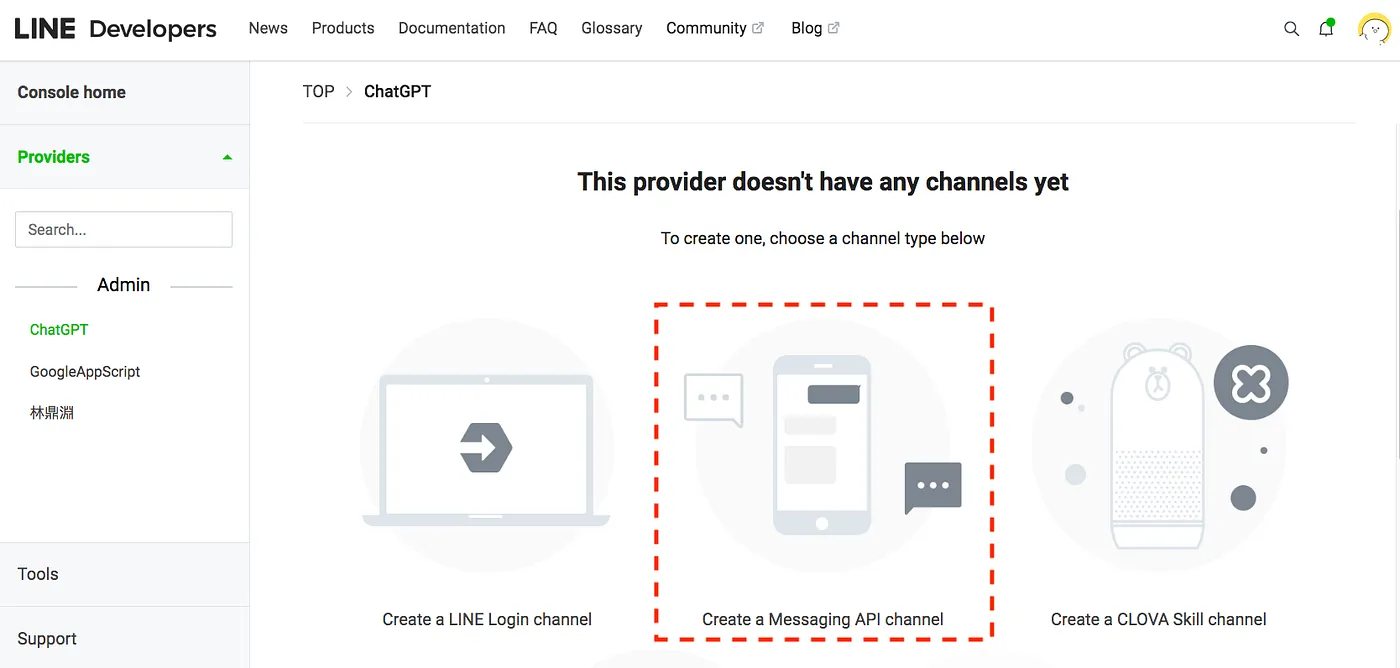
SETP 3:選擇「Create a Message API channel」,我們要做一個聊天機器人。
接下來填寫一些必填資訊:
- Company or owner’s country or region:Taiwan
- Channel name:ChatGPT bot(自由填寫)
- Channel description:ChatGPT bot(自由填寫)
- Category:公眾人物、專業人士(自由填寫)
- Subcategory:IT、電腦(自由填寫)
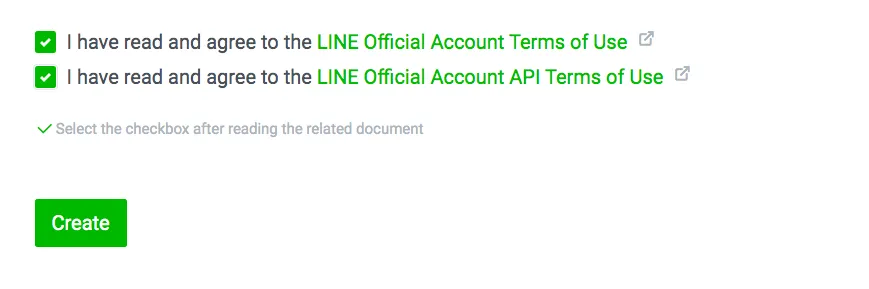
SETP 4:最下面兩個同意事項要打勾才能按下「Create」按鈕。
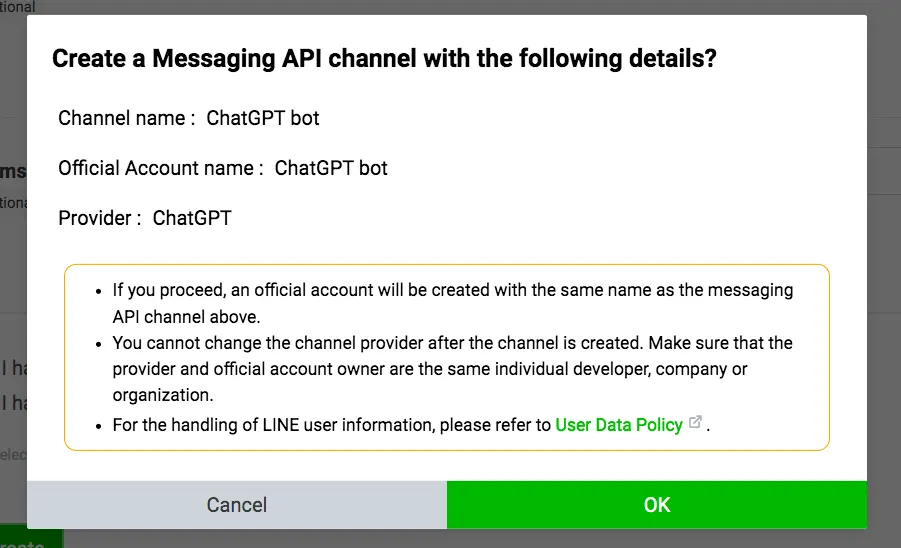
最後會讓你確認一下填寫的細節,還有一些規則提醒。
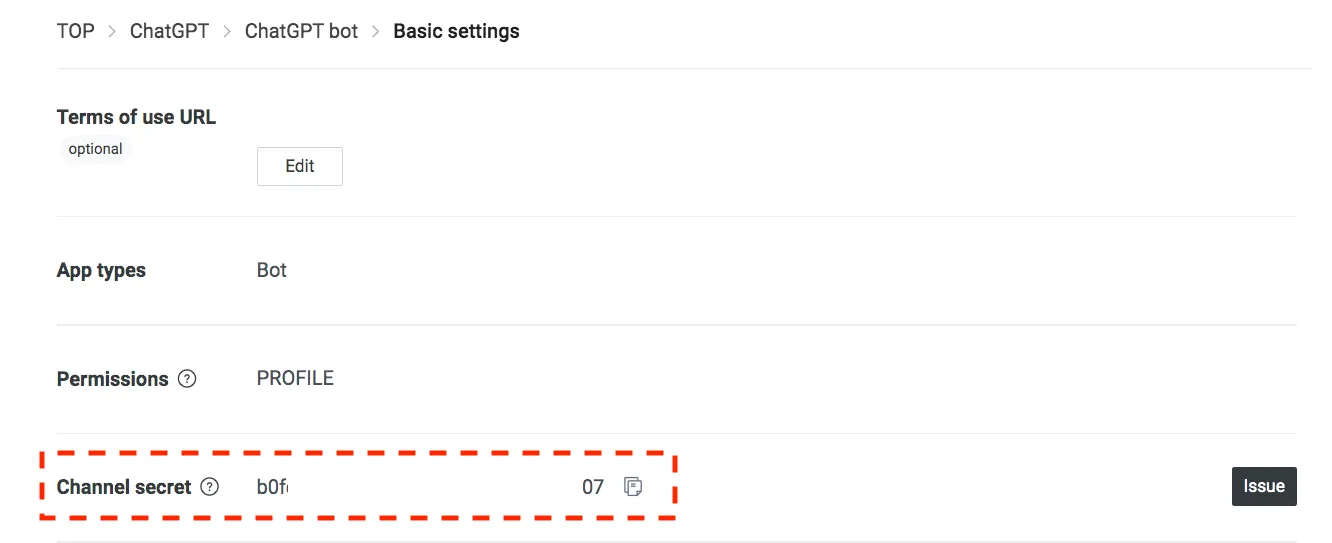
SETP 5:在 Basic settings 取得 Channel secret(這邊 ChatGPT 說錯成 General settings,不過大體意思能理解)。
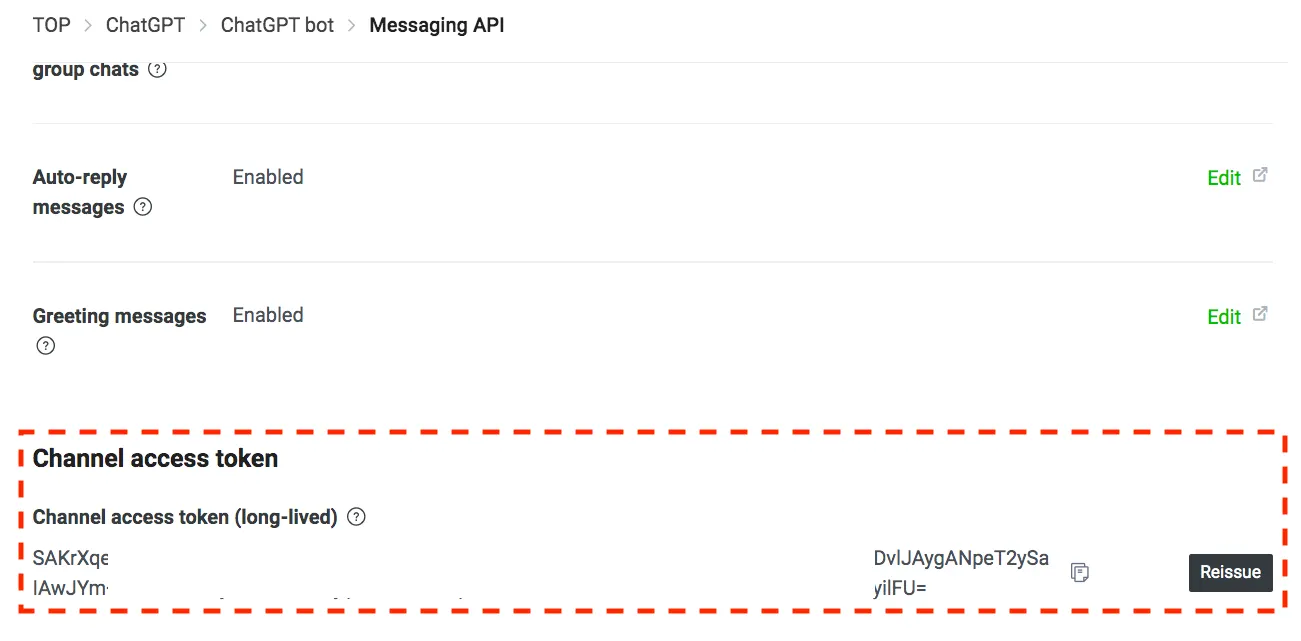
SETP 6:在 Messaging API 取得 Channel access token。
注意:
Channel access token 是用來驗證和保護機器人與 LINE Platform 之間的通訊,因此請勿將它公開給任何人。
Channel secret 則是用來驗證 Webhook 事件的簽章。
建立 OpenAI-Linebot 的 Node.js 專案
下面的步驟,我是透過詢問 ChatGPT 所得到的:「接下來要如何建立一個 Node.js 專案,並安裝"openai" 和 “@line/bot-sdk” 等套件呢?有相關指令與程式範例嗎?」
SETP 1:建立一個新的專案目錄,並在終端機中進入該目錄。
mkdir myproject
cd myproject
SETP 2:建立一個 package.json 檔案,並設定專案的相關資訊。
npm init
SETP 3:安裝 “openai”、"@line/bot-sdk"、“express"套件(這邊原本是建議裝 line-bot-sdk 這個套件,但因為無法使用,所以請 ChatGPT 重選了一次)。
npm install openai @line/bot-sdk express
注意!在使用上面的指令前,需要先安裝 Node.js 和 npm。
SETP 4:建立一個新的檔案放程式碼。
touch index.js
SETP 5:在 index.js 中引用所需的套件,並設定 OpenAI 的 API key、Linebot 的 channelAccessToken、channelSecret。
const openai = require('openai');
const line = require('@line/bot-sdk');

openai.apiKey = "YOUR_OPENAI_API_KEY";

const config = {
  channelAccessToken: 'YOUR_CHANNEL_ACCESS_TOKEN',
  channelSecret: 'YOUR_CHANNEL_SECRET'
};

const client = new line.Client(config);
SETP 6:在 index.js 中建立一個 HTTP server 並設定 line 的 webhook。
const express = require('express');
const app = express();
const port = 3000;

app.post('/webhook', line.middleware(config), (req, res) => {
  Promise
    .all(req.body.events.map(handleEvent))
    .then((result) => res.json(result))
    .catch((err) => {
      console.error(err);
      res.status(500).end();
    });
});

app.listen(port, () => {
  console.log(`app is running on port ${port}`);
})
SETP 7:在 index.js 中建立一個事件處理函式,當使用者發送訊息時,使用 OpenAI API 將訊息傳到指定的語言模型處理,並將回應的結果傳回給使用者。
function handleEvent (event) {
  if (event.type !== 'message' || event.message.type !== 'text') {
    return Promise.resolve(null);
  }
  return openai.Completion.create({
    engine: "text-davinci-002",
    prompt: event.message.text,
  }).then(response => {
    return client.replyMessage(event.replyToken, {
      type: 'text',
      text: response.choices[0].text
    });
  });
}
SETP 8:最後啟動伺服器 node index.js

喔喔喔!居然沒有報錯!!!
之後可以請 ChatGPT 幫我完成 Side Project 了嗎?
小提醒:程式能啟動跟能順利執行是兩件事。
小結:他還在努力學習中
其實過程並沒有想像中順利,上面放的步驟已經是多次優化後得到的答案,下面筆者放幾個請 ChatGPT 優化的片段。
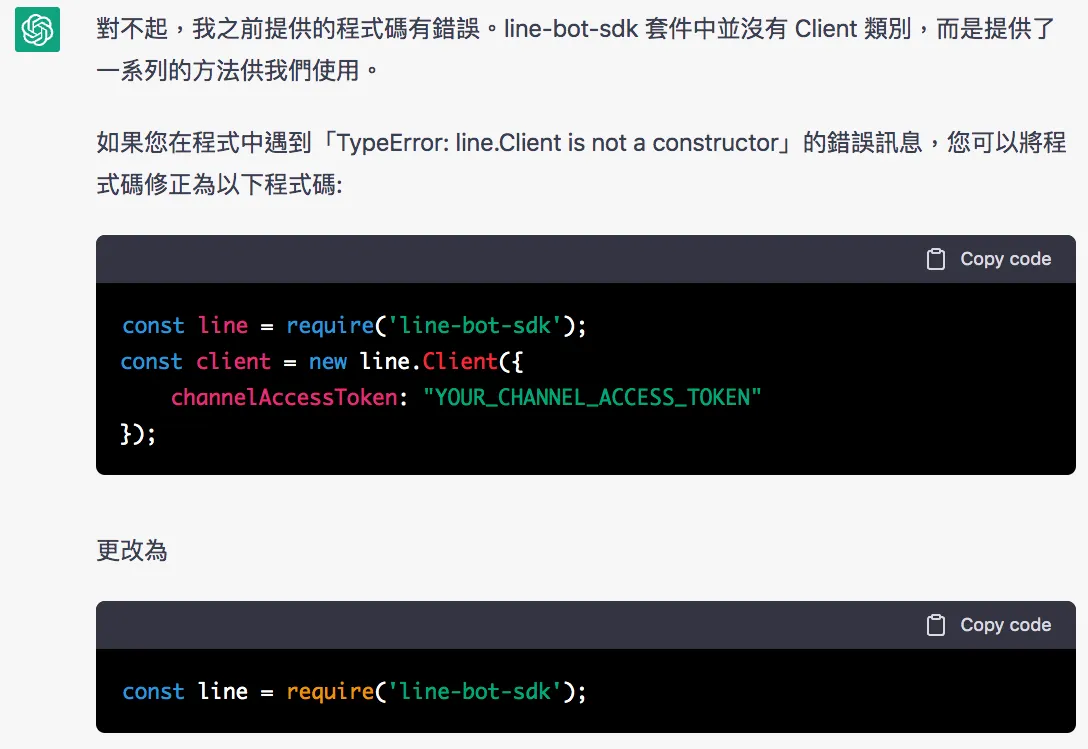
錯誤 1: 我按造步驟執行後,會噴錯誤:「TypeError: line.Client is not a constructor」
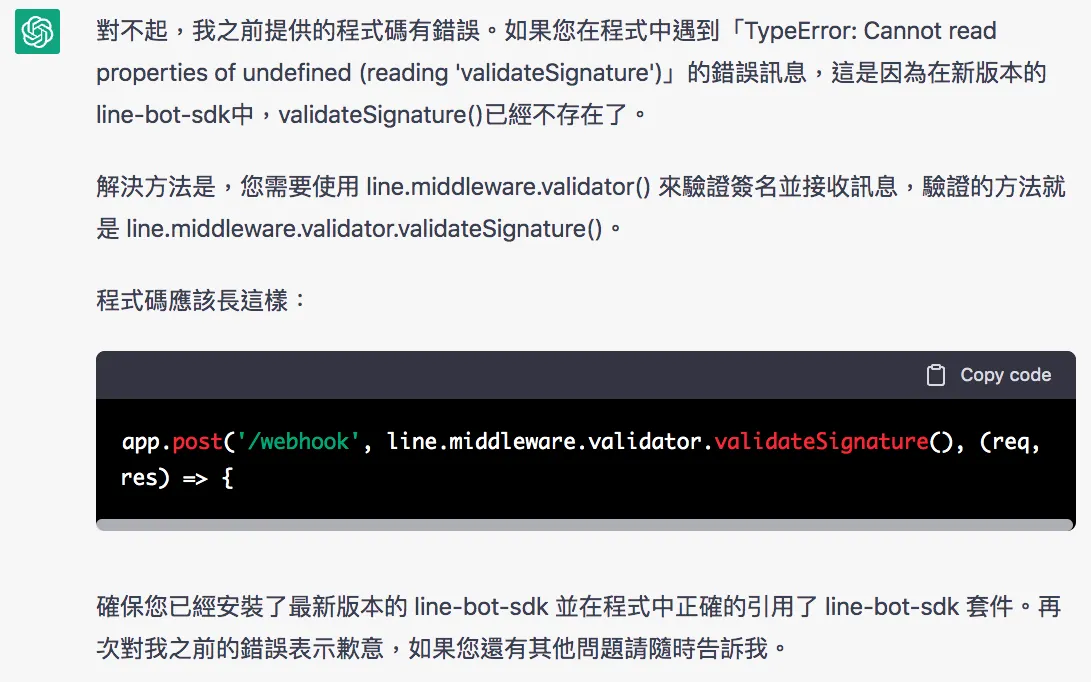
錯誤 2:我調整後,會噴錯誤:「TypeError: Cannot read properties of undefined (reading ‘validateSignature’)」
其實還有其他錯誤,只是這兩個最嚴重,所以筆者單獨拿出來說一下。
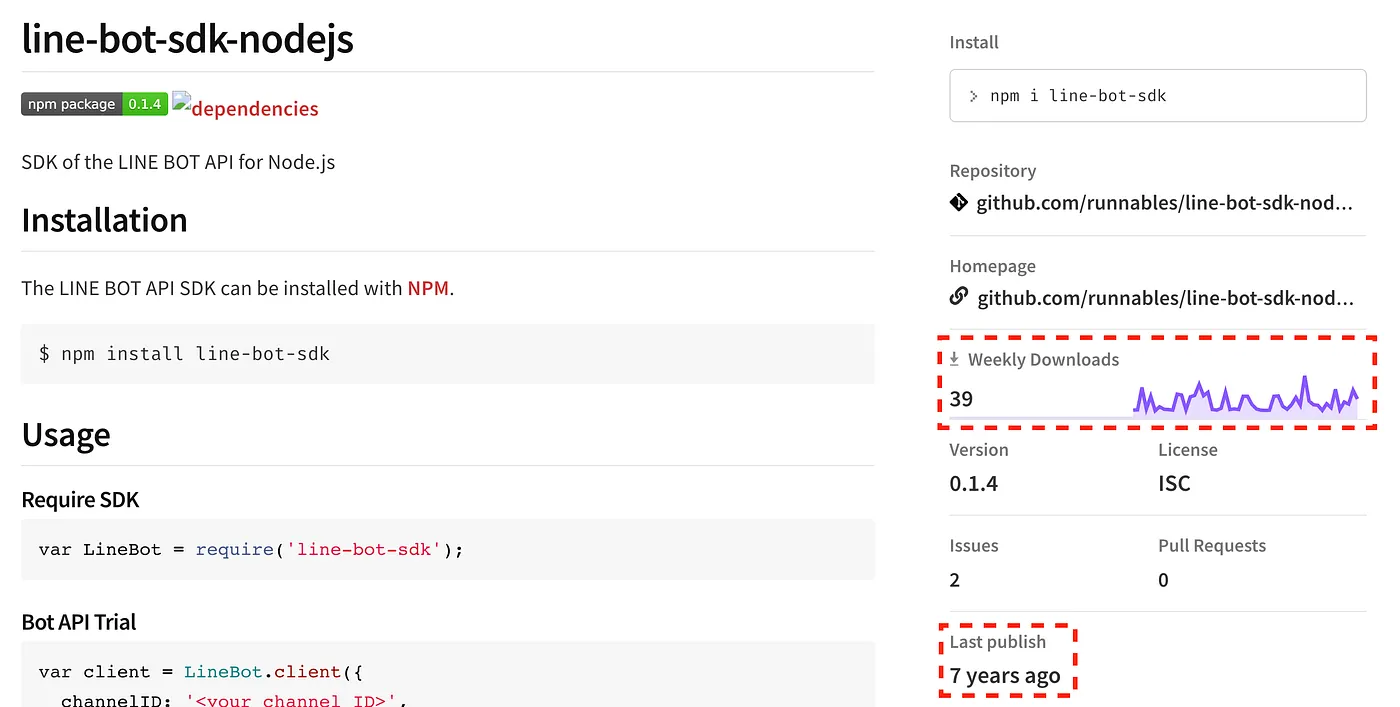
對初學者而言而言,他們可能會覺得是程式哪裡寫錯了,只要修改一下就好;但實際上,真正的問題是 ChatGPT 一開始推薦安裝的套件「line-bot-sdk」就是有問題的。
這邊放個截圖給大家看一下,這款套件已經有 7 年多沒有更新,而且幾乎沒有下載量!如果是缺乏經驗的開發者,應該會在這裡卡很久。
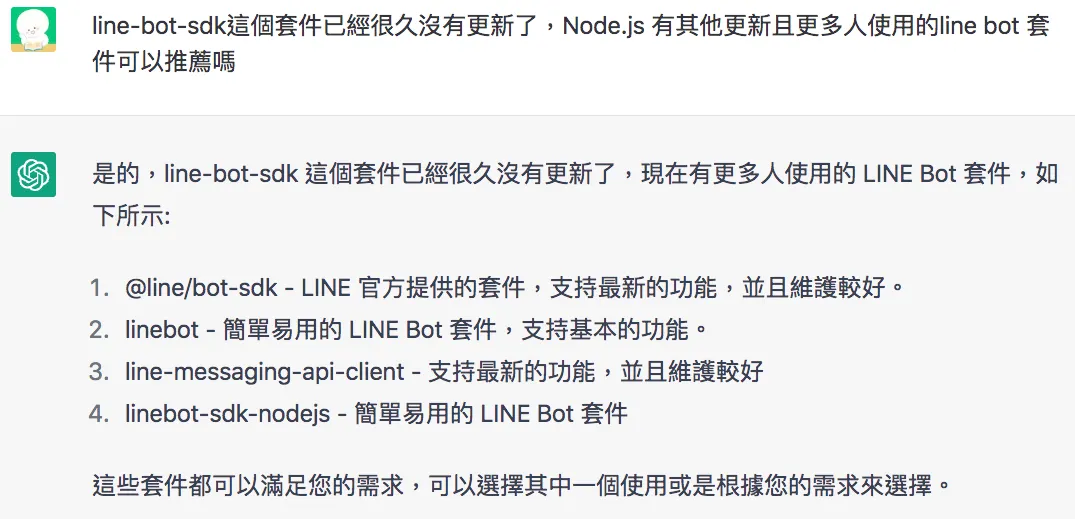
後來我請他重新推薦,ChatGPT 才給了比較合理的套件,最後我請他改用「@line/bot-sdk」重寫一遍才得到上面的結果。
不知道這篇文章會不會勸退一些使用者?
其實 ChatGPT 的問題並不只這些,下一篇文章我會帶大家把後面「啟動 server 並在 Line 開發者平台設定 webhook 的網址、測試機器人是否能正確回應使用者的訊息」等步驟走完,希望筆者踩過的坑能讓讀者日後使用時少走點彎路。
本次 ChatGPT 回應的完整程式請參考筆者的 Github
未來筆者會出一系列使用 ChatGPT、openAI 的文章,如果你對這個議題感興趣,可以持續關注我的文章!
AI 實戰 實測生成式 AI 工具、Vibe Coding 與自動化流程的第一手心得,把 AI 變成每天都用得上的即戰力。 林鼎淵 Dean Lin想將 AI 導入自己的職場與生活嗎?歡迎購買筆者出版的新書,幫助您在 AI 的浪潮中站穩腳步,並在未來的職場競爭中佔據優勢!



留言載入中…